This post may contains affiliate links. As an amazon associate I earn from qualifying purchases.
Here is a clean, CPU-only, work flow in order:
If you follow these step wise instructions, you can generate any image, whatever. Please note that, this is not for GPU, so image generation can take time, few minutes.
Just run these commands at your terminal. This is compatible for linux version.
1. Prep & folder
mkdir -p ~/Desktop/Work_folder/stable-diffusion-deforum
cd ~/Desktop/Work_folder/stable-diffusion-deforum
2. Clone the WebUI repo
git clone https://github.com/AUTOMATIC1111/stable-diffusion-webui.git
cd stable-diffusion-webui
3. Install Python 3.10 if not already (Ubuntu)
sudo apt update
sudo apt install software-properties-common
sudo add-apt-repository ppa:deadsnakes/ppa
sudo apt update
sudo apt install python3.10 python3.10-venv python3.10-distutils

Please note the cersion of python you have, install the one which matches above.
4. Create & activate venv with Python 3.10
cd ~/Desktop/Work_folder/stable-diffusion-deforum #where you have your project
python3.10 -m venv venv  #this will create your venv
source venv/bin/activate
cd stable-diffusion-webui  #make sure you are in the right folder.
5. Install CPU-only PyTorch
pip install --upgrade pip
pip uninstall torch torchvision -y
pip install torch torchvision --index-url https://download.pytorch.org/whl/cpu

This is forthe cpu, not the gpu. else it will not work.
6. Launch the WebUI in CPU mode (skip CUDA checks)
./webui.sh --skip-torch-cuda-test --precision full --no-half

Run this command on the terminal. This is not a python3 command
7. Open the interface
In your browser go to:
http://localhost:7860

This will open actually automatically, when you run webui command.
“Want to write prompt in the python script. Another way, the hard code way ! Check this out .. How to Run Stable Diffusion on CPU with Python | AI Image Generation Without a GPU!”
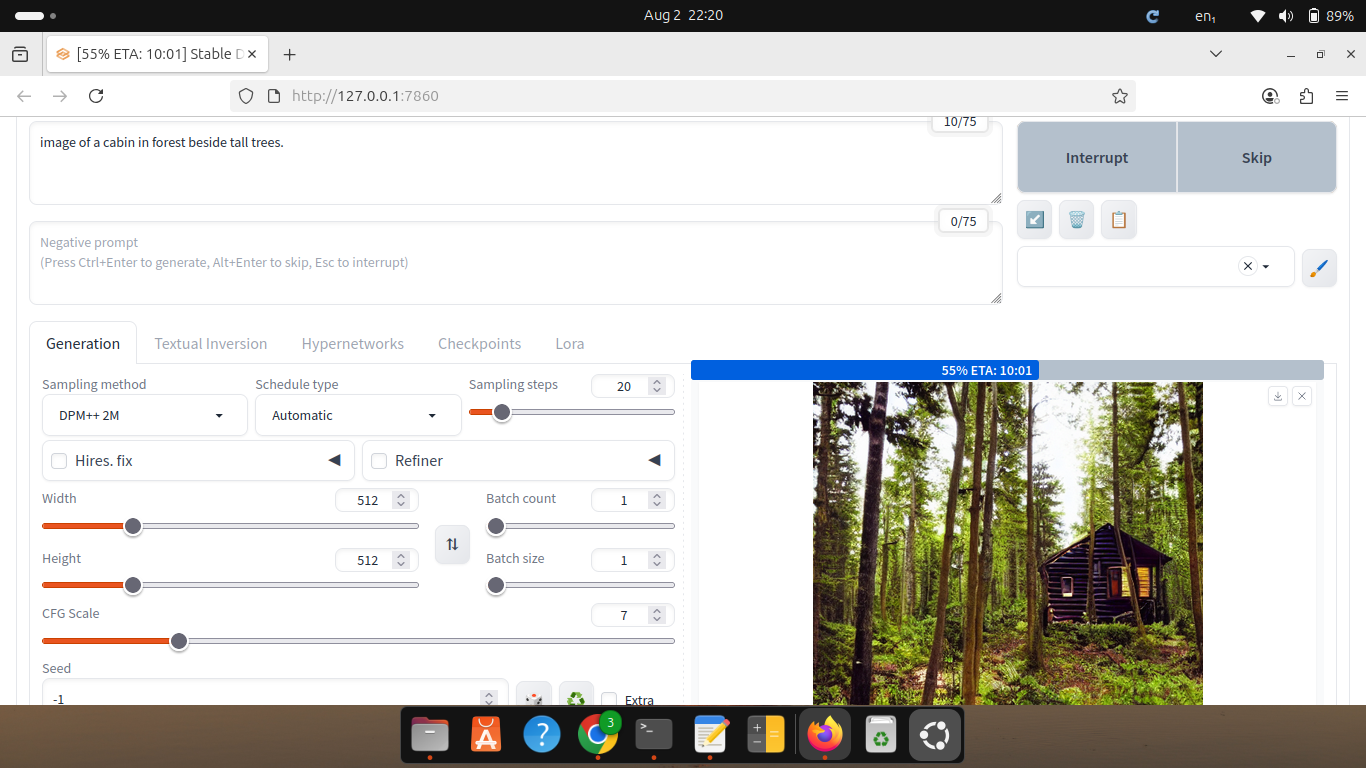
8. Quick CPU-friendly image generation settings
- Prompt: simple descriptive text (e.g., “sunrise over misty mountains”)
- Width / Height: 512×512 (lower = faster)
- Sampling steps: 10–15
- Sampler: Euler A or DPM++ 2M Karras
- CFG Scale: 7–8
- Batch size: 1
- Seed: leave random for variation or fix for repeatability
Click Generate. Expect seconds-to-minutes per image depending on CPU.
Here is the screen shot of the image with prompt I tried.
9. Optional improvements
- If you want higher quality after a quick draft: increase steps to 25–30 or use img2img to refine.
- Save prompts and seeds for reproducibility.
- Upscale outputs later with a separate tool if you need larger resolution.
10. Next when ready
- Install Deforum extension for text-to-video via the Extensions tab (URL:
https://github.com/deforum-art/sd-webui-deforum) and restart UI. - Then switch to Deforum tab to set up a short clip.
That’s the minimal, ordered CPU-only workflow for generating images.
Once done, next time when you eant to use this code, just follow these instructions.
Activate venv: like
/Desktop/Work_folder/stable-diffusion-deforum/venv/bin/activate
Go to WebUI folder:
Desktop/Work_folder/stable-diffusion-deforum/stable-diffusion-webui
Run:
./webui.sh –skip-torch-cuda-test –precision full –no-half
This post may contains affiliate links. As an amazon associate I earn from qualifying purchases.